Tuesday, February 21, 2006

Culinary Conference in Seattle


Thanks to a tip from Shirley Corriher, who called to tell me where my soufflés may have gone wrong, I heard that the International Association of Culinary Professionals holds its conference here in Seattle on March 29. Along with the 25 for $25 happening the month of March, this will be one hard week to get a reservation in town at the better eateries as these people will not be content with the monstrous servings of Cheesecake Factory glop ordered from a menu of ads. Here is a link to the IACP recommended places to eat, alist worth printing and keeping in your car if not in your Blackberry.
The conference itself looks like lots of fun, a hell of a lot more fun than the American Institute of Architects conference, which should be brought up on charges of extortion. Aside from the usual demos and conference, there is a food photography contest, chocolate tours, and cookbook boot camp. This seems like an excellent way to take a few vacation days.

Friday, February 17, 2006

Brokeback Mountain grocery list

Can any blog not mention the movie of the year, Brokeback Mountain?

So here we go into some sterotyping, but you have to wonder why this stereotype exists. Most people think of gays as being urban hipsters, but most gay families actually tend to live out in the Midwest and the South, according to the Urban Land Institue. And of the top ten states, cities and towns for proportional same-sex couples, the # 10 on the lists are Arizona, Austin, and North Druid Hills, GA. So much for hip...

Anyway, regardless of the ULI, gay men are supposed to have good taste buds that go along with their great taste in clothes and apartments, which if you have ever known gay men you know nothing could be further from the truth (no matter how much they tell you how to furnish or dress). You take all the guys who are so uptight about their physiques and weight gain, and you have the largest consumer of canned tuna (in water!)and poached chicken breasts. No, taste is not in the gay DNA. But onto some humor:

Ennis' and Jack's weekly grocery lists. The original emailed list has been revised.
Brokeback Mountain Weekly Grocery Lists
WEEK ONE
Beans
Bacon
Coffee
Whiskey

WEEK TWO
Beans
Ham
Coffee
Bourbon

WEEK THREE
Beans al fresca
Thin-sliced Bacon
PC Hazelnut Coffee
Skyy vodka & Tanqueray gin

WEEK FOUR
Beans en salade
Pancetta
Coffee (espresso grind)
5-6 bottles best Chardonnay

WEEK FIVE
Fresh Fava beans
Jasmine rice
Prosciutto, approx. 8 ounces, thinly sliced
Medallions of veal
Quebec Grade A Maple Syrup
Porcini mushrooms
1/2 pint heavy whipping cream
5-6 bottles Okanagan Ice Wine (Estate
Reserve)

WEEK SIX
Yukon Gold potatoes
Heavy whipping cream
Asparagus (very thin)
Organic Eggs
Spanish Lemons Oka cheese (well aged)
Dry-aged sirloin
Crushed Walnuts
Arugula
Clarified Butter
Extra Virgin Olive oil
Pure Balsamic vinegar 3 Cases of Vintage Dom Perignon


Born-again cooks

I wish I could remember where I first read about “born-again cooks” needing constant validation. You know the type: You have to rave about everything, can’t suggest anything, and God forbid that your noticing something comes under the category of criticism. They are out to convert you, no matter your own beliefs, just like a born-again vegetarian, born-again Christian, and my favorite, the born-again virgin. They go into fits when you ask for ketchup for the roast potatoes, and make snide comments about your knives, pans, and other kitchen equipment. Food snobs have nothing against these people as they don't have the fervor--the passion—that a simple snob lacks.

Villa Adriana

Back in grad school I had the unique opportunity to work on an architectural dig at Hadrian’s Villa (Villa Adriana) outside of Tivoli in Italy. With all the digging, walking, measuring, and hauling rock, I not only kept off the pasta-gelato pounds, but I not only shed the ten pounds gained my first year as a graduate, but actually reduced my weight to my high school days. And when I returned to the US, sporting a haircut from Rome, a bronze Mediterranean tan, Italian threads, and a new sleek self, I felt like that fat chick from the Judith Krantz novel, Scruples. Life is so easy in the superficial city of Los Angeles.
Anyway, we had two wonderful women who prepared our meals for us. One item that we never got tired of was this amazingly simple salad that the high-priced restaurant on the lake used to serve of melon with arugula.

Melone con rucula
Extra virgin olive oil
Chopped arugala, a good handful
Cantaloupe, skin removed and sliced
Place cantaloupe slices on a platter. Drizzle generously with olive oil. Sprinkle with the chopped arugala. Season with fleur de sel and freshly-ground black pepper. Serve immediately or the salt will begin to draw out the water.
Alternatively the melon can be chopped into bite-size pieces.

Maple-ize: Word of the Day


Maple-ize should be a verb more often used in food preparation. Well, it should be a verb, period. And here is a delicious example of why.

Maple-ized Carrots (adapted from Cook's Illustrated)
1 pound carrots, peeled and cut into 2" strips
1 teaspoon olive oil
1 tablespoon unsalted butter
1 teaspoon Grade B maple syrup
1. Heat a heavy cast-iron skillet over medium heat. Add oil and butter, and then add carrots to the melted butter in a single layer. Cover and roast, stirring occasionally as the carrots roast to a nice deep brown, about 10-15 minutes.
2. Stir in maple syrup, coating carrots, and continue roasting about 3 minutes longer, stirring to make sure the syrup does not burn.
The syrup will thicken to an almost candy-like coating (as if carrots aren't sweet enough).
Serves 4


Maple-ize--spread the word.

Wednesday, February 15, 2006

Best Cheese Fondue

Fondues were extremely hip in the 50's and 60's, and seemed to have been a featured item at the dinner parties of socialites, suburban housewives, and hippy communes. You can find new fondue sets at all sorts of kitchen, life-style, and department stores in a variety of styles and within any price range. Thrift shops and antique galleries that carry mid century furnishings, though, will yield the best buys in terms of quality, price, and memories. It is pretty likely that you will come across a pot that will look like something your parents had or would have had. If you do not have a fondue pot, be sure to use a large, wide-mouthed heat-proof ceramic, porcelain, or enameled cast-iron pot.

Most basic fondue recipes call for Swiss cheese, but there are so many wonderful types of Swiss cheese, it would be a shame to use just one. This recipe combines the wonderful melting qualities and tastes of three aged cheeses: Raclette, Gruyere, and Appenzeller.

Raclette is a whole cow's milk Swiss cheese not only in name and flavor but in origin as well. It resembles the better known, and more fully flavored, Gruyere with its slightly rough, light-brown rind . The interior also is firm, pale-ivory-yellow to light-brown but has more holes. Its nutty flavor tends to be milder than gruyere. It melts wonderfully, and is best known in making raclette, where the warmed cheese releases further flavors and aromas. Years ago a friend smuggled a wheel back from his native Switzerland in his ski boot bag. Nowadays, of course, you can find it any good cheese store or on the Web. It is also called Belsano, Belalp, Bagnes, Gomser, and Valais Raclette.

Perhaps the best known of the real Swiss cheeses, Gruyere cheese comes from the Gruyere district of Switzerland. Cooks reach for it to create fondue and gougere. It is made of whole cow's milk; one pound of regular Gruyere cheese requires five quarts of milk. Its full flavor is nutty and spicy, and lend itself to a cheese plate as well as to other dishes.

Appenzeller comes mostly from the canton of Appenzell. It is made from raw and aged for approximately three months. Appenzeller is an aged cow’s milk that is perhaps my favorite snacking cheese with its smooth texture, fruity tang, and slight nuttiness. The rind of this pressed, cooked-curd cheese is completely edible, so you don't have to waste time and cheese by carving away a stone hard exterior, wax, or whatnot. Its interior has small holes, and the smooth texture fills the mouth in a most satisfying way (which is probably why I love to snack on it.) Like the other Swiss cheeses, it melts well.

Cheese Fondue (adapted from Martha Stewart--when her recipes rocked)
Serves 4

1 clove garlic, halved, green kernel removed
2 teaspoons cornstarch
2 tablespoons kirsch (cherry brandy) or brandy
1 1/2 cups dry white wine
1/4 teaspoon sweet paprika
1/4 teaspoon freshly grated nutmeg
1/4 teaspoon freshly ground pepper
12 ounces Raclette cheese, shredded
4 ounces Gruyère cheese, shredded
4 ounces Appenzeller cheese, shredded

1. Rub the garlic inside the
fondue pot. Dissolve cornstarch in brandy, and set aside.
2. Pour wine into pot, and bring to a simmer over medium heat. Add paprika, nutmeg, and pepper. Stir in cheese with a wooden spoon. Cook, stirring constantly in a figure-eight pattern, until completely melted.
3. Add reserved cornstarch mixture, and continue to stir until thickened and creamy.
4. Place on the lit burner of your fondue set, and serve immediately with bite-size pieces of boiled potatoes, apples, cornichons, and day-old artisan bread. (If at any time it starts to
separate, simply continue to stir in the figure 8 pattern.)

The wonderfully-delicious crusty cheese at the bottom of the pot goes to the person who has successfully not lost any piece while dipping.

Caramel: the marriage of heat and sugar


Everyone knows and loves chocolate fondue, but sometimes tastebuds crave a little something extra. A caramel fondue offers a great alternative. It is deceptively simple to make, and once mastered, offers an awesome sauce that can be used in everything from sundaes to Chocolate Sea Urchins.

If you don’t know how to ready the various stages of sugar color and balling, you’ll need a thermometer that can read temperatures beyond 350 degrees. Only when it is a deep-amber color should the hot cream be added. This will ensure the correct taste and keep the fondue from clumping.


Caramel Fondue

Serving: 2 cups
2 cups granulated sugar
1 cup heavy cream
pinch salt
2 tablespoons
cold unsalted butter
Dash of vanilla extract (optional)

1. Pour 1 cup water into medium heavy-bottomed saucepan. Add sugar to center of pan, being careful to not get it on the pan sides. Cover, and bring to boil over high heat. Uncover pot, insert candy thermometer, and continue to boil about 15 minutes until syrup is thick and straw-colored (300 degrees on candy thermometer). Reduce heat to medium; continue to cook until sugar is deep amber, begins to smoke (350 degrees), about 5 minutes longer. Meanwhile, bring cream and salt to simmer in small, heavy-bottomed saucepan over high heat. (If cream reaches simmer before syrup reaches 350 degrees, remove cream from heat and set aside.)
2. Remove sugar syrup from heat. Pour about ½ cup of hot cream into sugar syrup; let bubbling subside, then add remaining cream. Add bubbling subsides, whisk gently until smooth, then whisk in butter and vanilla. Let cool until warm; serve. (Can be covered and refrigerated up to 1 month. Reheat in microwave or small saucepan over low heat.)
3. Serve warm caramel fondue in a small fondue pot with a widemouth made of heat-proof ceramic, porcelain, or enameled cast-iron over a small flame with chocolate chunks, apple, banana, butter cookies, or nuts.


The fondue can also be used as a caramel sauce.

For a more sophisticated version, with a bit more bitterness, not so numbingly sweet, carefully take the temperture to 380 degrees.

For safety, be sure to have a bowl of ice water nearby.

Oh, and it is "caramel," not "carmel," a town in California.


Friday, February 03, 2006

Crunchy banana, mister?


Some articles will make you dream of a certain dish. This made me dream of not just this dish, but has set up a new standard of spousal interaction. Philippe Conticin, then head chef at the Petrossian Boutique and Cafe in New York, wrote how his wife, an engineer by profession, concocted this awesome little dessert after he had explained how salt carries the flavors and sweetness of other ingredients. I love the image of this engineer, excited by a discussion with her spouse, conducting her own experiments in the kitchen.

He describes the resulting dessert as

“not a restaurant dessert, and yet, it is no ordinary home dessert. It is what I call "gourmand" — yummy, that is. It is like the Little Prince: appealing to children and adults alike. For pastry chefs, that is the ultimate goal… Her sandwich is made with a rather coarse grain-flecked whole wheat bread, whose outer layers are spread with butter and sugar. Inside, it is layered with thin
slices of very ripe banana, a dash of cinnamon and ground ginger, and a healthy pinch of fleur de sel. As a finishing touch, there's a drizzle of sweetened condensed milk. The sandwich is then pressed closed and toasted in a sandwich griddle. The sandwich warms through, the milk moistens the middle and the outside gets crispy and caramelized.”

Long-time readers of this blog know that nothing will grab my attention like the combination of the words “moist”, “crispy” and “caramelized.” Like its namesake, croque monsieur (literally “crunch mister”), this banana version has a satisfying crisp crust, but its crispness owes more to a crème brulee-like thin layer of caramelized sugar. But unlike croque monsieur, the Banana Croque-Monsieur works as a breakfast treat as well as a dessert for anytime of the day or night. (BTW He wrote this with Amanda Hesser, who I think does her most memorable writing within the framework of a relationship such as Mr. Latte, relatives or old friends.)


Banana Croque-Monsieur (adapted from Philippe Conticin in the New York Times)
Time: 20 minutes
8 slices high-quality multigrain country bread such as Orowheat
6 tablespoons melted butter
8 teaspoons sugar
2 very ripe bananas, peeled and thinly sliced
4 large pinches ground cinnamon
4 pinches ground ginger
4 pinches fleur de sel
8 teaspoons sweetened condensed milk
1 tablespoon lemon zest for garnish (optional)


1. Heat a sandwich griddle or a large skillet on medium-high. Brush butter on one side of each bread slice. Sprinkle 1 teaspoon sugar evenly over each slice.

2. Place four bread slices on a work surface, butter-and-sugar side down. Place bananas in equal portions on the slices, leaving a 1/4- inch border. Sprinkle a large pinch of cinnamon, a pinch of ginger and a pinch of fleur de sel on each slice, and then drizzle 2 teaspoons condensed milk over the slice.

3. Top each sandwich with a slice of bread, butter-and-sugar side up. Transfer sandwiches to griddle and cook until edges are crisp and well browned and sandwiches are warmed through, about 2 minutes. Flip and cook the other side. These will burn quickly. (Alternatively, cook sandwiches in skillet, using a large spatula to gently compress them and brown them evenly, about 2 minutes on each side.) Garnish with lemon zest, and serve hot. They can also be made a head of time and heated in a warm oven.
Yield: 4 servings.


Slabs of sludge

Finally--someone agrees with me about the Costco birthday cake. The LA Times published a review of three cakes, in response to Saveur’s listing it as one of the ‘’favorite restaurants, food, drink, people, places, and things" from around the world’. While it still is a great place for toilet paper or to feed your favorite fraternity, I have to take issue with sheet cakes that bring to mind the negative connotations of the word “slab” and a list of ingredients that brings to mind “sludge.” There are so many great local bakeries, why not celebrate the birthday boy or girl with something more individual? Since I was a kid I have always loved the Gingerbell (now Borrachinis) cakes, but the other night I had the best birthday sheet cake from Seattle’s Magnolia Bakery aka Upper Crust Bakery on McGraw. The cake had nice flavor and crumb, and the frosting was not a thick layer of goop, but was instead a justifiable thickness of fluffy cream, sugar and flavoring. Support your local bakery!

Thursday, February 02, 2006

Biscotti


No food blog would be complete without some sort of Proustian madeleine. Since most madeleines leave so much to be desired, I have never understood the magic of these cookies.

I remember when I was a little child gnawing on what I thought was biscotti. I mentioned this to my mom a few times over the past few years and she just laughed. Biscotti only recently has been available so mass-market that you would give it to a kid. But two years ago I mentioned it again, but this time Dad chimed in that Emma, his boss' Italian wife used to bring me biscotti for teething.

Emma passed away several years ago, but I tracked down her daughter who "found the recipe in the old red and white tin recipe box [she] inherited from her mother. She never used a recipe herself, but she must have written it down at some point so she could share it."


Emma Bonica's Biscotti

5 cups flour
5 tsp baking powder
1/2 tsp salt
2 tsp anise seed
3 eggs
1 1/2 cups sugar
2 tsp vanilla
1/2 cup milk
1 cup shortening (vegetable oil or melted butter)
1/2 cup chopped nuts (toasted almonds are best)

1. Sift together
the flour, baking powder, and salt onto a flat surface (a counter or large cutting board).
2. Make a well in the center of the flour mixture; it should look like a wide volcano crater.
3. Break the three eggs into the crater.

4. Using a table fork, beat the eggs to combine whites and yolks, then gradually add sugar, vanilla, milk, and shortening. Blend liquid ingredients thoroughly in the center of the flour crater.
5. Using the fork, gradually gather in small amounts of the flour from the inside perimeter of the crater, blending each forkful into the liquid center. The trick is to avoid breaking the flour barrier and having the liquid center flow outward onto the counter and floor.

6. As the center becomes more and more solid with the addition of the flour, begin kneading the dough with your hands. It will be sticky at first, but keep adding flour gradually.
7. Knead in chopped almonds.
When dough is still soft, but no longer sticky, form it into flat rectangular loaves 1/2 inch thick, 6 inches wide and 8-10 inches long.
8. Bake loaves for 10 minutes on cookie sheets.
9. Remove loaves from oven, cool slightly, and slice into 3/4 inch widths.
10. Lay slices on their sides and replace in oven to toast until golden; turn slices over and toast other sides.
11. Cool on racks.

* You can also mix dough in a bowl.


Below is my revised version. They are crunchy and hard, definitely meant for dipping. Still sometimes I'll chew on one, completely destroying any benefits of wearing that expensive night guard, and pushing me ever so closer to veneers.

AJ's Biscotti (adapted from Emma Bonica)

2 cups unbleached all-purpose flour
1 teaspoon baking powder
1/4 teaspoon table salt
2 large eggs
1 cup granulated sugar
1/2 teaspoon vanilla extract
grated lemon zest (one lemon’s worth)
2 teaspoons anise seed
1/4 chopped nuts (hazelnuts, pine nuts, almonds)

1. Preheat oven to 350 degrees, and place the oven rack in the middle.
2. Sift together the flour, baking powder, and salt onto a flat surface (a counter or large cutting board). Make a well in the center of the flour mixture; it should look like a wide volcano crater.
3. Break the three eggs into the crater. Using a table fork, beat the eggs to combine whites and yolks, then gradually add sugar, vanilla, zest and anise. Blend liquid ingredients thoroughly in the center of the flour crater.
4. Using the fork, gradually gather in small amounts of the flour from the inside perimeter of the crater, blending each forkful into the liquid center. The trick is to avoid breaking the flour barrier and having the liquid center flow outward onto the counter and floor. As the center becomes more and more solid with the addition of the flour, begin kneading the dough with your hands. It will be sticky at first, but keep adding flour gradually. Knead in chopped almonds.
5. When dough is still soft, but no longer sticky, form it into 2 flat rectangular loaves 1/2 inch thick, 3 inches wide and 8-10 inches long.
6. Bake loaf for 30 minutes on a cookie sheet spread with parchment paper, rotating pan once, until golden.
7. Remove loaves from oven, cool slightly, and slice into 3/8 inch widths diagonally with a serrated knife.
8. Lay slices on their sides and replace in a 325 degrees oven to toast until golden; turn slices over and toast other sides (about 11 minutes per side).
9. Remove from cookie sheets and cool completely on racks before storing in an airtight container.

Since this version contains no butter or shortening, it will keep for up to a month. If you add butter, say a half stick, the biscotti will be richer, less crunchy, and more edible as a regular cookie. They will also only last a week or so before the flavor begins to go off.

Wednesday, February 01, 2006

Leave my leaves alone


Does anything say Autumn more than falling leaves? Here, maple syrup, sugar, and butter combine to form a wonderful alternative to the usual holiday sweets. RD is allergic to all tree products except maple syrup, so he goes crazy for these. It looks like a chore to ice all these cookies, but he was smiling the entire time. We prepared a basket for him to send his mom, but I don’t think they made it to post office. We decided that we like the cookies with a glaze, not iced or frosted. The glaze provides just the right amount of visual sheen, added flavor and sugar without being cloyingly sweet. We also liked them crispy—the extra browning and crunch made the cookie more complex than what Martha recommends.


Autumn Maple Leaf Cookies (adapted from Martha Stewart Holiday Cookies)
Makes about 60 cookies

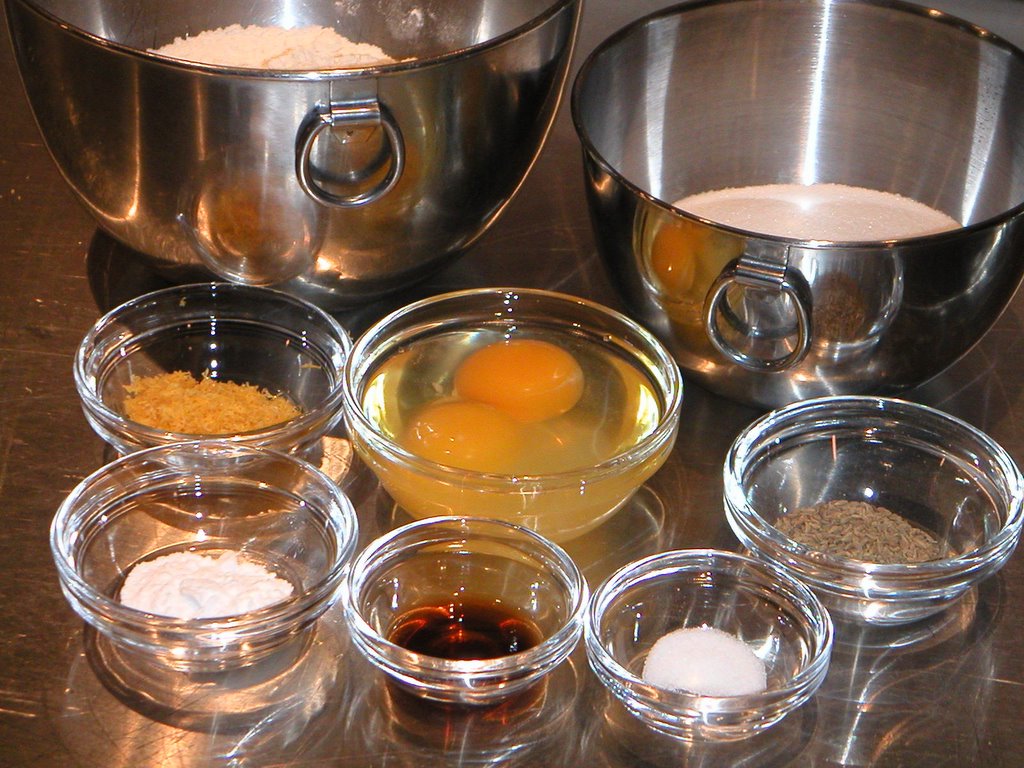
1 cup (2 sticks) unsalted butter, room temperature
1 cup granulated sugar
1 cup grade B maple syrup (if using regular syrup, add a few drops of pure maple extract for a more robust flavor)
1 large egg yolk
3 cups all-purpose flour, plus more for dusting
1/2 teaspoon salt
1 cups confectioners’ sugar


1. In the large bowl of an electric mixer, cream together butter and granulated sugar. Add 1/2 cup maple syrup and egg yolk; mix until well combined. Sift together flour and salt over mixture, and combine thoroughly. Divide dough in half, flatten into a disk, wrap in plastic, and chill until firm, about 2 hours.
2. In a medium bowl, whisk together the remaining 1/2 cup maple syrup and confectioners’ sugar until smooth, adding more maple syrup for piping consistency, if necessary. Cover tightly with plastic, and set aside.
3. Preheat oven to 350°. Line four baking sheets with Silpat baking mats or parchment; set pans aside.
4. Remove half of dough from refrigerator. On a lightly-floured surface, roll dough out to an 1/8-inch thickness. Using a 2- to 3-inch leaf-shaped cookie cutter, cut out cookies, and transfer to prepared baking sheets, spacing cookies 1/2 inch apart. Chill any trimmings, and roll out again. Repeat process with remaining half of dough. If desired, use the back of a paring knife to score veins on leaves.
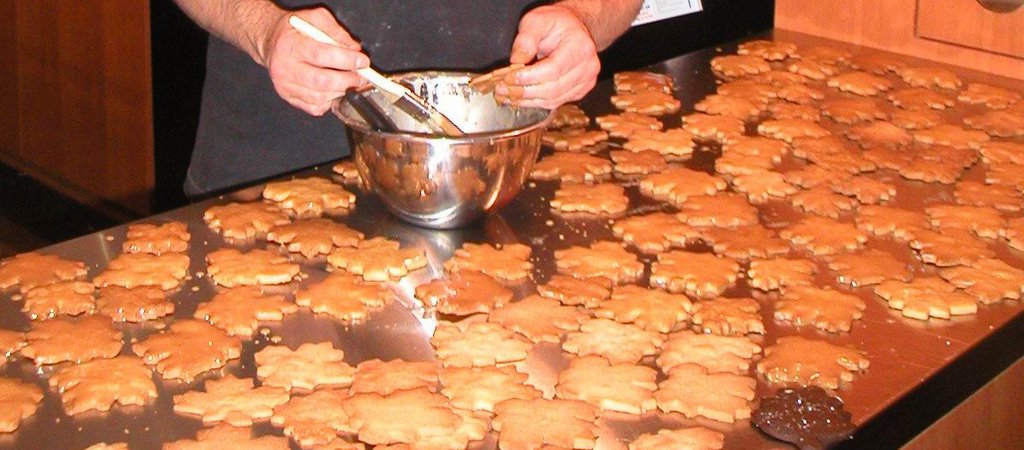
5. Bake cookies until light golden around edges, about 12 minutes. Transfer baking pans to a wire rack for 5 minutes. Using a spatula, remove cookies from pans to a wire rack to cool.
6. Using a pastry brush, glaze the cooled cookies with the maple mixture.

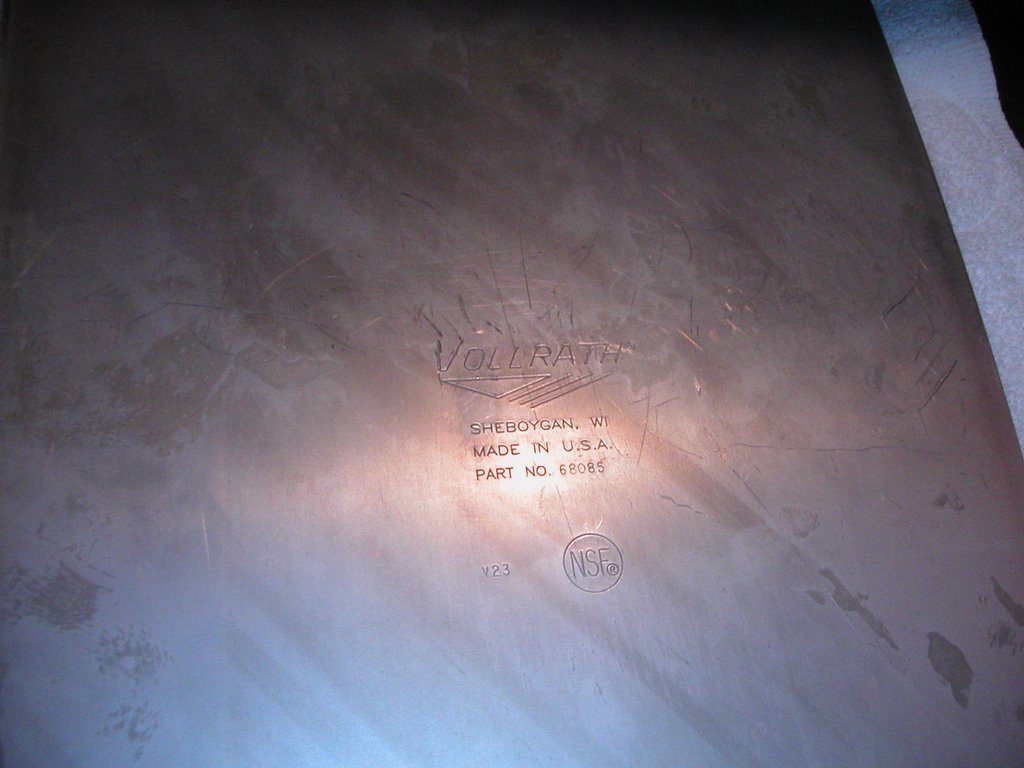
This was my first time using my new Vollrath cookie sheets. Cooks Illustrated rated them the perfect cookie sheet if you could find them. At over 2.5 #s of steel, they are sturdy, and won't warp at high tempertures. I didn't grease the sheets or use parchement, and the cookies came off with no sticking. (Maybe age will affect them, though.) the downside is that they stay so HOT after the baked are removed that cookies with butter will just gloop and spread a little too much before they are even in the oven. But at a quarter of the price of the All-Clad, and better-rated, you can afford a few more, and really, during the holidays, do you ever have too many GOOD cookie sheets?

Stuff it


Today was the end of my arteries as I know them. After taking the Charcuterie class at Culinary Communion, I tackled sausage making on my own, armed with my old Mixmaster, the meat grinder and stuff attachments, and recipes for French merguez and boudin noir (blood sausage). I picked up pig blood, and hit the Pike Place Market for pork shoulder, lamb, and fat back, and casings.
The blood sausage is not as gross as you would imagine. Its not like being on Fear Factor. In fact, when the blood pops out of the container, it is so gelatinous that it reminds you of canned cranberry sauce (and is as just as appealing). And mixing up the meat, fat, spices and blood was just like mixing ketchup into meatloaf.

The recipe called for 1/4 teaspoon of quatre epices, which research showed as a combination of four spices of varying quantities and spices. I settled on powdered ginger, black pepper, ground clove,and ground nutmeg. Since I needed it for the merguez as well, I decided to make a large batch and store the remainder. So a few teaspoons of this, and a teaspoon of that, and 6 teaspoons of freshly ground black pepper all went into a clean glass bowl for my mise en place, which I then threw into the mixer. Only after it had all blended did I realize I had thrown in all nine teasppons instead of the required 1/4 teaspoon. It sure smelled good though.

But it got to be pretty nasty when I had to stuff the casings. The machine would clog, and blood would spurt all over. (I still am finding it on the pendant lights.) Blood was all over my face and glasses. Pushing the mixture into the machine would create a suction and fart-like noise but the whole sausage-making process was such that you had to disengage yourself
from the corporal and not think of bodily functions, because that would lead you to think of the body, and that to blood, and fat and muscle, and then the task at hand. Best to just get on with the job of stuffing the cranberry mixture.

Dale finally came over and helped when he realized that I would be serving these on Sunday for a birthday dinner. He was grossed out to say the least (and he didn't even see the blood splattered all over my face.).

But as he loves boudin noir, he steadfastly faced his task, and continued to force the mixture into the machine while I held the casing and pulled it along. Finally we finished, and we cleaned up. Well, after two good bleachings, that blood still stains my jacket and counter towel. Luckily the stainless countertops stood up to their name, and were a cinch to clean.


As for the gingerbread boudin noir, they were delicious. The spice was definitely there, but not as obnoxious as I had feared. The texture was sublime, with little bits of white fat that melted in the mouth, creating that wonderful texture obtainable only through pork fat. In fact, if I hadn't known better, I would have thought that boudin noir was supposed to be this spicy, and would have thought everything else bland.

You say Timballo, I say Timpano


The LA Times featured a
timballo (timpano), which made it into the American culinary lexicon via the movie The Big Night. The recipes given were pretty simple compared to other recipes. One website contrasted the timballo with the timpano, noting the main difference is the outer layer of pastry crust on the timpano. This could be like cassoulet, with endless pedantic debate on the origins, ingredients, and construction of a true timpano or timballo. And like a cassoulet, the recipes seemed involved and time consuming.


Whatever the case for true origins and ingredients may be, the recipe that Regina Schrambling presents for Rice Timballo with Prosciutto and Peas is simply delicious and wonderful eating, full of flavors and contrasting crunchy and creamy. With its Emilia-Romagna heritage of parma ham and percorino romano, how could it go wrong?


As for simplicity, the dish is really just a bunch of simple recipes and techniques strung together: risotto and pecorino is pressed into a spring-form pan’s bottom and sides, and filled with a gussied up béchamel, which is covered with more rice mixture like a bombe.

Then it is dotted with cheese and butter and baked like a casserole. A few additional minutes at higher heat for further browning only adds to the visual appeal.

This would be a great potluck dish when you want to blow away the competition, I mean other guests’ dishes.